Chapter 5 turns strategy into structure using white-box decomposition. It describes the static building blocks of your system, their responsibilities, and the most important dependencies, without diving into runtime flows.
Learn what belongs in chapter 5, what to keep out, and get a copy/paste template plus a real example from Pitstop.
This post is about chapter 5: Building block view,
the second chapter in the “How is it built and how does it run” group.
Chapter 4 set direction; chapter 5 makes it tangible.
Here you describe the static structure of the system: the building blocks, what each one is responsible for,
and which dependencies matter.
The goal is not to document everything.
The goal is to give readers a mental map of the solution, so changes and discussions stop happening “in someone’s head”.
Note
This post is longer because chapter 5 introduces hierarchical decomposition (a.k.a. zooming in step by step):
start small, and only add detail when it prevents real misunderstandings.
What belongs in chapter 5 (and what does not)
The main job of chapter 5 of an arc42 document is to answer:
What are the main parts of the system, and what is each part responsible for?
What belongs here:
A building block hierarchy (level 1–3), from coarse to detailed.
Per building block:
responsibility (one sentence)
key dependencies
main interfaces (what it offers/needs)
The boundaries that matter: ownership, responsibilities, and “who is allowed to change what”.
When multiple teams work on the same system, building block boundaries often align with team ownership.
If changing a block requires coordination with another team, that boundary is worth documenting.
The structural consequences of your strategy from chapter 4
(e.g., modular monolith vs distributed, having a BFF, etc.).
Links to source code or generated docs when that helps (if building blocks map to modules/packages/repos).
What does not belong here:
Copy/pasting large parts of earlier chapters.
Refer back to the goals, constraints, and context when you need them,
but keep this chapter focused on responsibilities and boundaries.
Step-by-step flows, sequencing, or “and then it calls X” stories.
This chapter is about static structure, not behavior.
Environment-specific deployment and infrastructure details.
Keep those concerns separate so the building block view stays stable even when environments change.
Full interface specifications and contract catalogs.
You can link to OpenAPI/AsyncAPI or other specs, but avoid duplicating payloads and edge cases here.
Low-level implementation decisions that change frequently.
If it is likely to flip during sprints (a library choice, an internal pattern tweak),
it does not belong in the core structure.
The “white-box” metaphor
The core concept of this chapter is the black-box vs. white-box approach.
Chapter 3 was the black-box view: The system is a sealed opaque block.
We only described what crosses the boundary (interfaces) and who sits outside (neighbors),
but internals were invisible (hence “black” or opaque).
Chapter 5 is the white-box series:
We “open the lid” of the system. We look inside to see how it is constructed.
Level 1 opens the main black box. If a component inside Level 1 is complex,
we treat that component as a black box first, then open it up in Level 2 (its white-box view).
This hierarchical decomposition is standard in arc42 and aligns with the C4 Model “Zoom” concept.
Levels mean different things in different documents
First, a blunt disclaimer: The building block levels are a zoom tool, not a fixed taxonomy.
You stop decomposing when you can no longer explain why the detail matters to your architectural goals.
What “level 1–3” means depends on what you are documenting:
For a large system, level 1 might be products, level 2 domains/services, and level 3 microservices.
For a single (micro)service, level 1 might be the service boundary, level 2 internal modules, and level 3 namespaces.
For a platform/library team, level 2 might describe public APIs or even classes,
because that is what stakeholders integrate with,
and level 3 might be implementation details that only the owning-team needs to understand.
Tip
Pick the level of detail that matches your stakeholders.
A diagram is successful when it answers their questions, not when it contains more boxes.
Level 1 should match chapter 3
Level 1 is where you show the system boundary and the neighbors.
It should include the same external neighbors you introduced in chapter 3.
Warning
Do not confuse context with building blocks.
Chapter 3: Who/what is outside, and what crosses the boundary?
Chapter 5 Level 1: What are the main internal building blocks,
and how do they depend on each other and their connection to the external neighbors?
That creates a nice “thread” through the document:
chapter 5: how we are structured to deal with that
chapter 6: how the collaboration plays out at runtime (spoiler alert! 🫣)
Do not repeat interface details on every level
Interfaces show up on multiple levels, but you do not have to repeat everything.
Repeating payloads and contracts at every zoom level creates noise and maintenance debt.
A practical rule:
Level 1: Name the interactions (e.g., “Appointments”, “Status Updates”) so the relationship is clear.
Level 2/3: Document the interface where the contract lives (e.g., in the integration module or port)
and link to the source/spec.
When you are describing interfaces on a level, it could be helpful to separate them into:
If building blocks map cleanly to code, link them.
Some teams generate docs straight from source (Doxygen-style or similar),
which can make this chapter accurate and cheap to maintain.
Example (Pitstop)
Pitstop is my small demo system for this series.
It is intentionally simple, so the documentation stays shareable.
This is what chapter 5 looks like when filled in.
5. Building block view
5.1 White-box overall system
Building blocks (level 1)
Block
Responsibility
Key Interfaces
Admin Overview UI
Dashboard, coordination, customer comms support
HTTPS/JSON to Backend
Workshop View UI
Bay/task board, fast updates, degraded mode
WebSocket/JSON to Backend
Backend
Core domain + APIs + orchestration
HTTPS/JSON + WS + internal module interfaces
Sync & Integration
Mapping + sync strategy per planning vendor
REST/JSON, webhooks, retry
Audit/Event Log
Immutable history for accountability + analytics
Append/read APIs
DB
Operational persistence
SQL (implementation-specific)
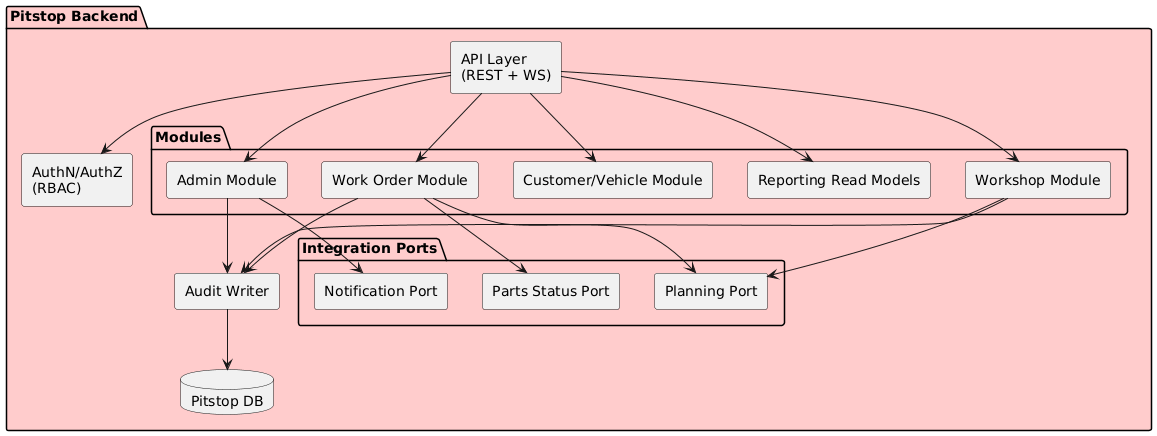
5.2 Level 2 - Pitstop Backend
Notes
Modules contain domain rules.
The Integration Ports (a ports-and-adapters pattern, as chosen in chapter 4)
isolate vendor protocols and mapping, so domain modules do not depend on external systems directly.
Reporting read models can be optimized independently (avoid OLTP pain).
Building blocks (level 2)
Element
Responsibility
Depends on
Work Order Module
Core logic for orders
Customer, Audit
Workshop Module
Mechanic task management
WorkOrders, Audit
Admin Module
Configuration & overrides
Audit
Customer/Vehicle Module
Shared entity data
Audit
Reporting
Read-optimized views
(Domain Events)
Planning Port
Adapter for Planning Service
External
Notification Port
Adapter for Notification Service
External
Audit Writer
Centralized compliance logging
DB
API Layer
Protocol handling (HTTP/WS)
Auth, Modules
To browse the full Pitstop arc42 sample, see my GitHub Gist.
Note
A level 3 zoom into the Work Order Module could show its internal structure
(e.g., command handlers, domain entities, validation rules) if stakeholders need that detail.
For brevity, we leave it out here.
Common mistakes I see (and made myself)
Too much detail too early
If chapter 5 looks like a class diagram, it will not be maintained.
Start coarse, and zoom in only where complexity justifies it.
Building blocks without responsibilities
Boxes called Service and Manager are not responsibilities.
Each block should say what it owns: persistence, state transitions, messaging, integrations, etc.
Mismatch with chapter 3
If chapter 3 lists neighbors, level 1 should show them. As you document the white-box,
you might find a specific module that talks to an external system you forgot to list in chapter 3.
Consistency goes both ways!
Repeating interface specs everywhere
Do not duplicate protocol and payload details on every level.
Put the detail where it makes sense (often chapter 3) and link to it.
Forgetting “source of truth”
For important data: who owns it, and who is allowed to change it?
If you do not answer this, production will answer it for you.
Using technology names as architecture
”Kafka” and “PostgreSQL” are implementation choices.
Building blocks should describe responsibilities (message bus, persistence, state, integrations),
so your diagrams remain useful when technology or deployment changes.
Done-when checklist
🔲 Level 1 includes the system boundary and the neighbors from chapter 3. 🔲 Each building block has a clear responsibility in one sentence. 🔲 External interfaces are referenced (and not duplicated) where documented. 🔲 Level 2/3 are used only when complexity or stakeholders require it. 🔲 A new team member can explain “what lives where” after reading this chapter.
Next improvements backlog
Add ADR links when boundaries or decomposition are disputed (chapter 9).
Add level 3 only for a few areas where deeper detail prevents misunderstandings.
Add links to code/docs where building blocks map cleanly to modules or repos.
Wrap-up
Chapter 5 is the map. 🗺️
It helps people find responsibilities, boundaries, and where to implement changes.
Next up: arc42 chapter 6, “Runtime view”, where we put this structure in motion and describe the most important end-to-end flows.