The Custom Vision service is one of the Azure AI Services that is provided by Microsoft. With custom vision, you can train a model with your own image data. The portal provides a Prediction API for the trained model to classify an image you supply.
There can be reasons why you might not want to use the online REST endpoint. For example, when processing images from a video feed, performance, connectivity, security, and costs might be considerations why you could prefer an offline model.
To work with machine learning in .NET, we can use ML.NET,
an open source and cross-platform framework.
There are several tutorials how to use this framework.
But none of them combine the Bitmap class
with a downloaded ONNX model from the custom vision portal.
In this article I will walk through the steps to set up an application to classify bitmaps using a custom vision model with ML.NET.
Exporting the trained model
First, get the model from the custom vision portal. If you do not have a model yet, I suggest following the quickstart “How to build a classifier with Custom Vision”.
-
Visit the Custom Vision portal.
-
Select the Performance page.
-
Use the Export button to download a zip file containing your model.
Note
If there is no export button, the model is trained without using a compact domain. This can be changed in the settings of the project. After training the model again, the export button should be visible.
-
Store the
model.onnxfile in a location where it can be loaded by the application.
Setting up the application
This example starts with a blank .NET C# Console application.
The following NuGet packages must be added:
- Microsoft.ML.OnnxTransformer (1.5.0)
- Microsoft.ML.OnnxRuntime (1.3.0)
- Microsoft.ML.ImageAnalytics (1.5.0)
Adding these packages will resolve all necessary dependencies. We can start developing the application.
The goal is to create a PredictionEngine<TSrc, TDst> class
based on a TransformerChain.
But as you can see by the generic notation of the prediction engine, two types need to be supplied as source and destination.
So, these will be created first.
Adding support classes
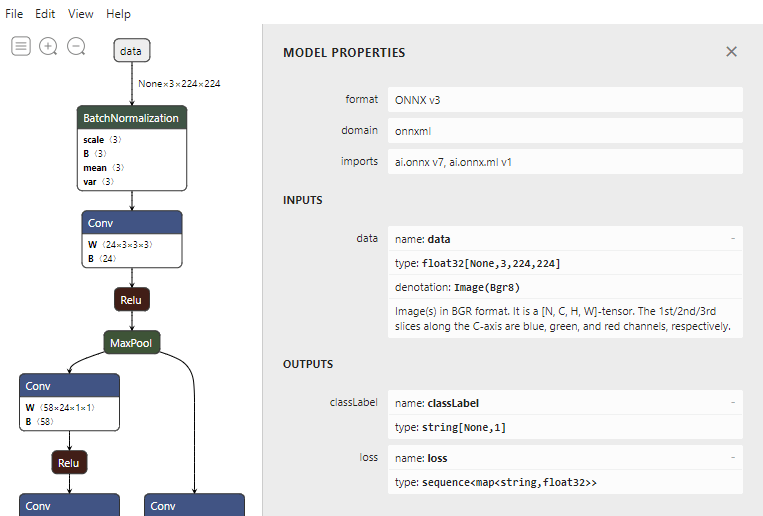
For these two simple classes, we need to know the corresponding property names and data types from the ONNX model. For this we can use a tool like Netron.
The first class we add will be the input for the transformation pipeline.
As the pipeline will not be able to infer the datatype from the .NET Bitmap type,
we annotate the property with the ImageTypeAttribute class.
As we can see in Netron, the model expects an input array with the size of 3×224×224.
This reflects three RGB bytes per pixel, for an image with a height of 224 pixels and a width of 224 pixels.
So, we set both the height and width parameters of the attribute to a value of 224.
public class ImageInputData{ [ImageType(224, 224)] public Bitmap Image { get; set; }}The second class we add will reflect the output of the prediction engine. Looking at the information in Netron,
this will be an array of a single string, with the name classLabel.
public class ImagePrediction{ [ColumnName("classLabel")] public string[] Labels;}Building the prediction engine
All following code will be added to the Main method of Program.cs.
On the first line, we create an instance of the MLContext class.
The MLContext class is the starting point for all ML.NET operations.
var mlContext = new MLContext();Next, we define the pipeline. The pipeline will consist of three transformation steps.
- The
ResizeImagesmethod resizes the image to the specified size. In this case,224×224. - The
ExtractPixelsmethod extracts pixel values from theBitmapinto a numerical vector. - The
ApplyOnnxModelmethod applies the pre-trained ONNX model to score on the data that is provided.
For the first two steps, the first parameter is the name of the output column, and the last parameter is the name of the input column.
The third method has the file location of the ONNX model as last parameter.
We also need to make sure the input and output columns match the names of the ONNX model.
Looking at Netron again, the column names are classLabel and data.
var pipeline = mlContext.Transforms .ResizeImages("image", 224, 224, nameof(ImageInputData.Image)) .Append(mlContext.Transforms.ExtractPixels("data", "image")) .Append(mlContext.Transforms.ApplyOnnxModel("classLabel", "data", modelLocation));The pipeline needs to know the data schema to operate on when the
Fit method is called.
Because we are not training the model, we can just supply an empty list of the input type.
var data = mlContext.Data.LoadFromEnumerable(new List<ImageInputData>());var model = pipeline.Fit(data);With this, everything is set up to create the prediction engine.
var predictionEngine = mlContext.Model.CreatePredictionEngine<ImageInputData, ImagePrediction>(model);And finally: classifying a bitmap
First, we create an input object with the bitmap. You can load a bitmap from a file, a stream, a video feed, etc. This depends on the design of your application.
var bitmap = … // your source of a bitmapvar input = new ImageInputData { Image = bitmap };Now we can call the Predict method
on the prediction engine. This will return the classification.
var prediction = predictionEngine.Predict(input);
var classification = prediction.Labels[0];
This should be all.
I shared the sample code on GitHub.