This post will be about a new sample of using “Sandboxable”. I wrote an article about sending messages on an Azure queue.
In this article, I will walk through the steps to create a Microsoft Dynamics CRM plug-in that on deletion of any record, stores the deleted data as a file on Azure blob storage.
Note
When using Azure blobs to store data, you should enable Azure Storage Service Encryption for Data at Rest.
As usual, you will find the links to the complete source code at the end of this post.
Setting up the project
For this sample, the steps for setting up the project are the same as the steps described in the previous post. So, I will not list them here again.
Writing the plug-in
I have based the plug-in code on the MSDN article “Write a plug-in”.
Getting the deleted entity
To get the details about the deleted record we need to get them from the PreEntityImage collection.
The registration of a Pre-Image will be described later in this post.
Entity entity = context.PreEntityImages["Target"];Getting the connection details
To connect to Azure blob storage, you need 2 details.
- The storage account name.
- One of the storage account access keys.
For this sample, I will use a JSON string stored in the secure storage property of the plug-in step.
To deserialize these settings we use JsonConvert with a nested PluginSettings class.
PluginSettings pluginSettings = JsonConvert.DeserializeObject<PluginSettings>(this.secureString);Initializing the Cloud Blob Client
The CloudBlobClient class offers an easy way to manage and use all Azure blob storage related resources.
To initialize this class, we need to provide the URL and the StorageCredentials.
StorageCredentials storageCredentials =      new StorageCredentials(pluginSettings.AccountName, pluginSettings.Key);
Uri baseUri =      new Uri($"https://{pluginSettings.AccountName}.blob.core.windows.net");
CloudBlobClient blobClient =      new CloudBlobClient(baseUri, storageCredentials);
Creating a root container
First, make sure there is a container to store all the contents generated by this plug-in.
With the blob client, we can create a reference to the CloudBlobContainer with the name that is stored in the constant named FolderName.
To make sure the container exists, we call the CreateIfNotExists method which ensures us if there is not a container present yet, it will be created at that moment.
CloudBlobContainer container = blobClient.GetContainerReference(FolderName);
container.CreateIfNotExists();
Creating an entity directory
Now we want to create a directory inside the container to store entity specific records.
CloudBlobDirectory entityDirectory = container.GetDirectoryReference(entity.LogicalName);Note
Directories differ from containers because they do not exist on disk. That is why we do not need to check if the directory already exists. If you are interested in more details, I recommend the article Modeling a Directory Structure on Azure Blob Storage by John Atten.
Adding a blob to the directory
Just like the container and the directory before, we also need to create a reference for the blob.
On the blob directory ask for a reference to the CloudBlockBlob using the GetBlockBlobReference method.
string fileName = entity.Id.ToString("N") + ".json";
CloudBlockBlob blob = entityDirectory.GetBlockBlobReference(fileName);
We will not create the blob immediately because we want to add some details about the content we are about to store.
This can be done by setting the Properties and Metadata properties of the blob.
One of the BlobProperties
we want to set is the ContentType property.
This will allow other systems to recognize the file correctly as a JSON file.
blob.Properties.ContentType = "application/json";However, the BlobProperties only contains a fixed set of properties.
By using the Metadata property
on the blob allows us to store custom metadata with the blob.
blob.Metadata["userid"] = context.UserId.ToString("B").ToLowerInvariant();blob.Metadata["userfullname"] = fullName;blob.Metadata["deletiondate"] = context.OperationCreatedOn.ToString("O");Now it is time to write some file contents to the blob.
We create blob data, using the context of the current plug-in execution.
For demonstration purposes we serialize the JSON with the Formatting option set to Indented.
Because the blob content is plain text, we can use the UploadText method.
var blobData = new  {    context.UserId,    FullName = fullName,    context.MessageName,    entity.LogicalName,    entity.Id,    entity.Attributes  };
blob.UploadText(JsonConvert.SerializeObject(blobData, Formatting.Indented));
Now build the project so we can proceed.
Register the plug-in assembly
Now the freshly baked assembly needs to be registered on the server.
The steps to do this are outside the scope for this post, but more information can be found in the
walkthrough: Register a plug-in using the plug-in registration tool.
Register the plug-in step for an event
To test the plug-in, we’ll register it asynchronously on the deletion event of every entity.
Warning
Dependencies on external resources should never be part of a synchronous pipeline.
In the Secure Configuration property, we set the value with the JSON object containing the connection information:
{ "AccountName": "loremipsum", "Key": "DDWLOREM...IPSUMr0A=="}(Obviously, these values do not represent real data)
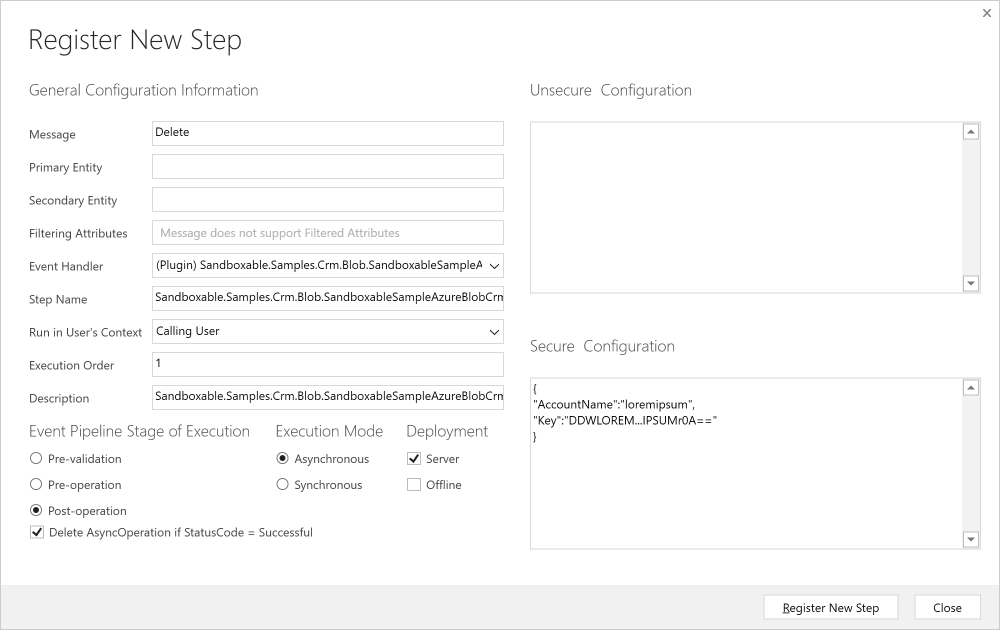
Because we are working with the deletion event, we need to register a Pre-Image to capture the values of all attributes before the actual deletion took place.
We set the value of the Name and the Entity Alias properties to Target

Testing the plug-in
We delete a contact in CRM. In my case the contact is called Sample User.
After a couple of seconds, we see the following container and directories appear on the storage account:

Screenshot from Azure Management Studio by Cerebrata
Opening the file in the contact directory, shows us some familiar content:
{ "UserId": "d617a1a0-359a-e411-9407-00155d0ae259", "FullName": "Lorem Ipsum", "MessageName": "Delete", "LogicalName": "contact", "Id": "6e843a34-91b1-e611-80e4-00155d0a0b40", "Attributes": [ { "Key": "firstname", "Value": "Sample" }, { "Key": "lastname", "Value": "User" }, { "Key": "fullname", "Value": "Sample User" }, ... ]}If we look at the HTTP response header when retrieving the file, we see that the content type and metadata properties are present:
HTTP/1.1 200 OKContent-Type: application/jsonServer: Windows-Azure-Blob/1.0 Microsoft-HTTPAPI/2.0x-ms-version: 2015-12-11x-ms-meta-userid: {d617a1a0-359a-e411-9407-00155d0ae259}x-ms-meta-userfullname: Lorem Ipsumx-ms-meta-deletiondate: 2016-12-08T14:23:25.5635361Zx-ms-blob-type: BlockBlobConcluding
By utilizing the Sandboxable Azure SDK, we only needed a few lines of code to store deleted CRM records in Azure blob storage, making a remote archive a piece of cake.
Tip
When using blob storage for archiving you might want to look at Blob Storage Accounts with Cool storage tier which might save you same money.
Sample code
The complete source code is available as a sample project.
Expect more samples in the Sandboxable-Samples repository on GitHub in the future.