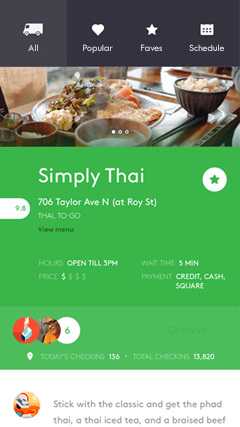
Not long ago I wrote a blog post about Responsive Pivot Headers in Universal Windows Platform apps. Paul responded asking how to change the background of the selected item, just like the example I posted on top of the article.
It is a great question and I am sorry I didn’t cover this so the pivot looks more like the example.
An omission I want to correct with this article.
The example
So, to brush up on the first post, here is the example again:

The solution
There are only 3 small changes to make to get the pivot more like the example.
- Add a dark background to the pivot header
- Change the color of the pivot header content to light so we can read it
- Add a lighter background to the selected pivot header
Adding the background
There is not really an element to set the background of the whole pivot header, so we have to add one.
In the Pivot Template we have created in the first post we add a Border to the Grid of the PivotPanel.
It gets the darker color and has to span the 3 columns.
<PivotPanel x:Name="Panel" VerticalAlignment="Stretch"><Grid x:Name="PivotLayoutElement"> <Grid.ColumnDefinitions> <ColumnDefinition Width="Auto"/> <ColumnDefinition Width="*"/> <ColumnDefinition Width="Auto"/> </Grid.ColumnDefinitions> <Grid.RowDefinitions> ... </Grid.RowDefinitions> <Grid.RenderTransform> ... </Grid.RenderTransform> <Border Background="#FF34323F" Grid.Row="0" Grid.Column="0" Grid.ColumnSpan="3" HorizontalAlignment="Stretch" VerticalAlignment="Stretch"/> <ContentPresenter x:Name="LeftHeaderPresenter" ... />Lighten up the foreground
Then we go the PivotHeaderItem style we also created before.
Here we add a setter so we can change the RequestedTheme to Dark.
<Pivot> <Pivot.Resources> <Style TargetType="PivotHeaderItem"> ... <Setter Property="RequestedTheme" Value="Dark" /> <Setter Property="Template">Adding the highlighted background
Now we go to the Visual State named Selected.
Here we change the Background color to the lighter color.
<VisualState x:Name="Selected"> <Storyboard> <ObjectAnimationUsingKeyFrames Storyboard.TargetName="ContentPresenter" Storyboard.TargetProperty="Foreground"> <DiscreteObjectKeyFrame KeyTime="0" Value="{ThemeResource SystemControlHighlightAltBaseHighBrush}" /> </ObjectAnimationUsingKeyFrames> <ObjectAnimationUsingKeyFrames Storyboard.TargetName="Grid" Storyboard.TargetProperty="Background"> <DiscreteObjectKeyFrame KeyTime="0" Value="#FF42424C" /> </ObjectAnimationUsingKeyFrames> </Storyboard></VisualState>And that is it!
It is not an exact replica, but you can change all the colors and sizes to accommodate your needs.

Source code
The source code of the sample project on GitHub has been updated to reflect these changes.
You can also go to the specific commit to see the exact changes.