A while back I have introduced Sandboxable
. It is a means to use NuGet packages that normally are not available for code that runs with Partial Trust.
In this article, I will walk through the steps to create a Microsoft Dynamics CRM plug-in that will add a message to an Azure queue.
At the end of the article, you will find the links to the complete source code for you to use.
Setting up the project
- Create a new
Class Libraryproject in Visual Studio - Add the following NuGet packages with their dependencies:
- Microsoft.CrmSdk.CoreAssemblies
This package will add the base to create a plug-in for CRM - MSBuild.ILMerge.Task
This package makes sure that the generated assembly will also contain all dependencies.
More information about this package can be found on the ILMerge MSBuild task NuGet package CodePlex page - Sandboxable.Microsoft.WindowsAzure.Storage
This package provides the Azure storage SDK, modified to run in the sandbox.
- Microsoft.CrmSdk.CoreAssemblies
- Change the
Copy Localproperty for the CRM references tofalse. These assemblies are already present in the runtime hosting the sandbox, so they can be kept outside our assembly - Enable strong name key signing on your project
Now you can do a test build of the project to check if everything works correctly.
Writing the plug-in
I’ve based the plug-in code on the MSDN article Write a plug-in
.
Getting the connection details
To connect to an Azure queue, you need 3 details
- The storage account name
- One of the storage account access keys
- The name of the queue
There are several ways to get these details at runtime. To name a few: hard-coded, stored as data in an entity, stored in a web resource as an XML file or in the plug-in step configuration.
For this sample we’ll use a JSON string stored in the secure storage property of the plug-in step.
To deserialize these settings we use JsonConvert with a nested PluginSettings class.
PluginSettings pluginSettings =
	JsonConvert.DeserializeObject<PluginSettings>(this.secureString);
Initializing the CloudQueueClient
The CloudQueueClient class offers a straightforward way to manage and use Azure queues.
To initialize this class, we need to provide the URL and the StorageCredentials.
StorageCredentials storageCredentials =
	new StorageCredentials(pluginSettings.AccountName, pluginSettings.Key);

Uri baseUri = new Uri($"https://{pluginSettings.AccountName}.queue.core.windows.net");

CloudQueueClient queueClient = new CloudQueueClient(baseUri, storageCredentials);
Creating a reference to the queue
With the queue client, we can create a reference to the CloudQueue with the name that is stored in the constant named QueueName.
To make sure the queue exists, we call the CreateIfNotExists method which ensures us if there is not a queue present yet, it will be created for us at that moment.
CloudQueue queue = queueClient.GetQueueReference(QueueName);

queue.CreateIfNotExists();
Adding the message to the queue
We create some message data, using the context of the current plug-in execution. This data is wrapped in a CloudQueueMessage.
We add the message to the queue, using the AddMessage method and we are done!
var messageData = new
{
	context.UserId,
	context.MessageName,
	entity.LogicalName,
	entity.Id,
	entity.Attributes
};

CloudQueueMessage queueMessage =
	new CloudQueueMessage(JsonConvert.SerializeObject(messageData));

queue.AddMessage(queueMessage);
We must build our project again so we can proceed.
Register the plug-in assembly
Now the freshly baked assembly needs to be registered on the server.
The steps to do this are outside the scope for this post but more information can be found in the walkthrough: Register a plug-in using the plug-in registration tool.
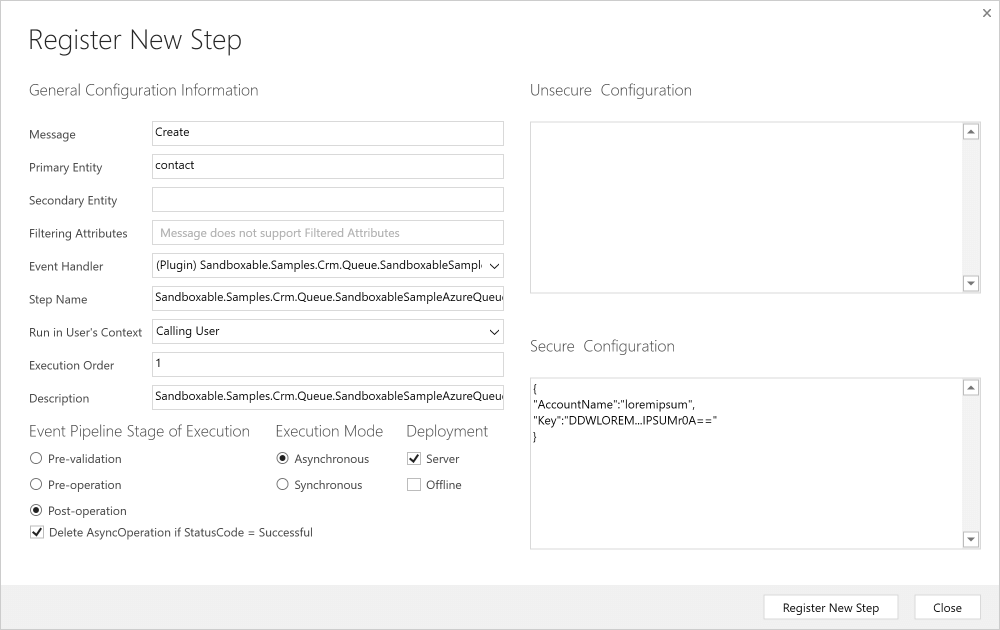
Register the plug-in step for an event
To test the plug-in, we’ll register it on the creation event of the contact entity.
For performance optimization we’ll choose the asynchronous execution method. External resources should never be part of your synchronous pipeline.
In the Secure Configuration property, we set the value with the JSON object containing the connection information:
{
	"AccountName":"loremipsum",
	"Key":"DDWLOREM...IPSUMr0A=="
}
(Obviously, these values do not represent real data)
Testing the plug-in
We create a new contact in CRM called Sample User.
After a couple of seconds, we see the following message appear on the queue:
{
	"UserId":"d617a1a0-359a-e411-9407-00155d0ae259",
	"MessageName":"Create",
	"LogicalName":"contact",
	"Id":"6e843a34-91b1-e611-80e4-00155d0a0b40",
	"Attributes":[
		{
			"Key":"firstname",
			"Value":"Sample"
		},
		{
			"Key":"lastname",
			"Value":"User"
		},
		{
			"Key":"fullname",
			"Value":"Sample User"
		},
		...
	]
}
(Formatted for readability)
Concluding
By utilizing the Azure SDK, we only needed a few lines of code to send messages to an Azure queue and making all sorts of integration with other systems possible.
By using the Sandboxable project we’re no longer limited by the sandbox.
Sample code
The complete source code is available as sample project.
Expect more samples in the Sandboxable-Samples repository on GitHub in the future.